Building an IoT Edge Application with macchina.io and Docker (Part 1)
Following up my previous blog post about edge computing, in this blog post I will show how to build an edge computing application by combining macchina.io EDGE and macchina.io Remote Manager with a number of other applications. These are Docker, as everything will be deployed in containers, Portainer, for providing a nice remotely-accessible web interface for managing Docker, as well as InfluxDB, a well-known time-series database. The actual “computing” aspect of this demo will be a bit limited, as we’re mostly writing sensor data into a time-series database and then building a dashboard. However, the setup will allow to add some sensor data analytics later on.
macchina.io EDGE will run a small JavaScript application that periodically acquires sensor data from an industrial-grade multi-sensor device (Bosch CISS) connected via USB, and write the sensor data (temperature, humidity, acceleration) into an InfluxDB database. I will use InfluxDB’s dashboard capabilities to create a dashboard showing the data. It’s also possible to add Grafana to the setup, for even better dashboarding capabilities.
macchina.io Remote Manager will provide remote access to all applications, via the macchina.io Remote Manager Gateway application, also running in a Docker container.
On the hardware side I will use a Raspberry Pi 4 (running Raspberry Pi OS Lite, formerly known as Raspbian) as edge device, although the whole setup can be replicated on any platform that runs Docker.
An interesting aspect of this demo is that it shows the macchina.io EDGE can be used in two ways. On the one hand, macchina.io EDGE provides quite comprehensive C++ and JavaScript APIs, giving you lots of flexibility for building fully custom IoT and edge device applications. On the other hand, macchina.io EDGE can also be used “out of the box” (in our case, using the available Docker image), as a “low-code” platform for writing edge applications in JavaScript, by just using the already available APIs and device integrations. In this demo I will focus on the latter.
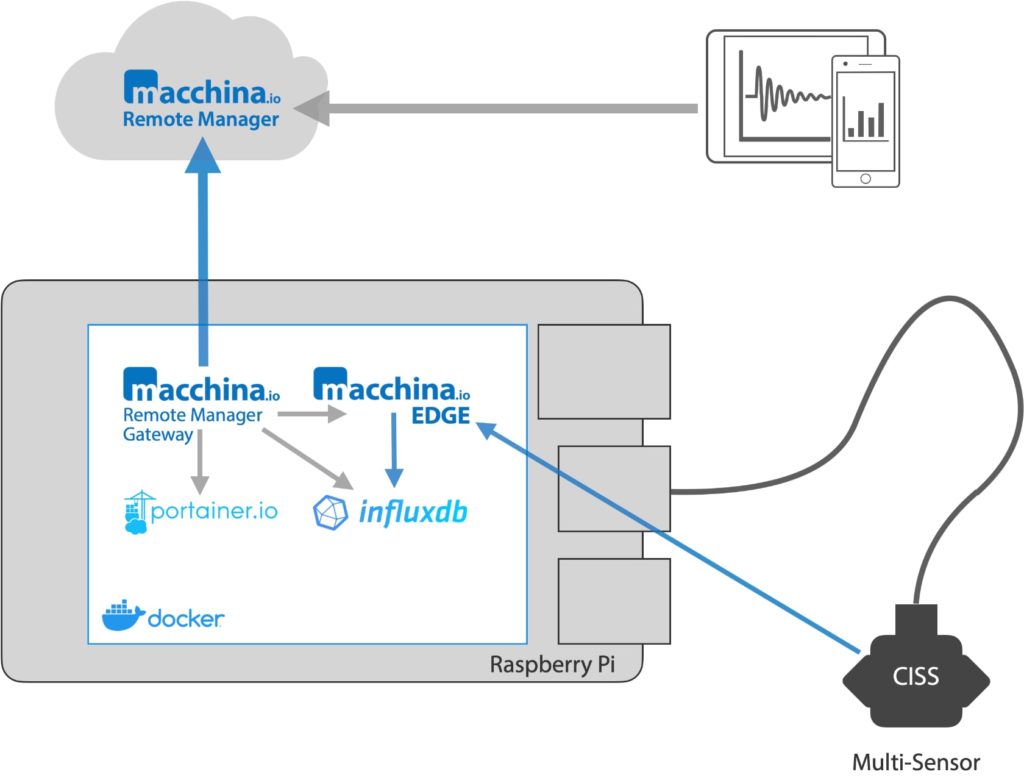
macchina.io Edge Computing Demo Setup
This blog post is split into two parts. In this first part, I will describe how to set up the basic system. In the second part, I will show how to build the JavaScript program that reads the data from the sensor and writes it to InfluxDB.
Prerequisites
In the following I assume you have some basic understanding of Docker and Docker Compose. Some experience working with a Raspberry Pi is nice to have as well, but not required. However, it’s also possible to run the containers on any machine where Docker is available.
Preparing the Environment
I’m starting with a clean Raspberry Pi OS Lite 64-bit image on an SD card (32 GB or more). Note that a 64-bit image is required because of InfluxDB, which currently only supports 64-bit architectures. The Raspberry Pi OS Lite 64-bit image can be downloaded from the Raspberry Pi Downloads server, using this link. Use the latest image version available, at the time of writing this was dated 2021-05-28. Open the image in Raspberry Pi Imager tool and write it to an SD-Card. Click the CHOOSE OS button, then select Use custom (the last option) and select the 64-bit image (2021-05-07-raspios-buster-arm64-lite.img). Then proceed as usual. The rest of the Raspberry Pi setup works just as with the “regular” 32-bit Raspberry Pi OS. Note that at the time of writing, the 64-bit version is still in beta, so some things may not work.
Note: it’s possible to run a variant of that setup on a 32-bit Raspberry Pi OS. For that you have to replace InfluxDB 2.0 with 1.8 and additional install Grafana for the graphing/dashboard capabilities.
First step, as usual, is expanding the file system to make all space on the SD card available, enabling SSH access and, finally, upgrading all Linux packages to their latest versions:
$ sudo apt-get update && sudo apt-get upgrade
You can verify that the Raspberry Pi is running a 64-bit OS with:
$ uname -m
aarch64
Optional Step: In order to monitor the memory usage of containers with Docker (and Portainer), two additional arguments must be passed to the Linux kernel at boot time, to enable cgroup memory accounting. This can be done by editing the
/boot/cmdline.txtfile and addingcgroup_enable=memory cgroup_memory=1to the end of the line.
Next is installing Docker. The easiest way is by running the convenience installer script from the Docker website. A quick word of warning: before running scripts downloaded from a website, always make sure to inspect the script first. To download and run the script, use the following commands:
$ curl -fsSL https://get.docker.com -o get-docker.sh
$ sudo sh get-docker.sh
This will download the script from the Docker website and execute it to install the latest Docker version. After the script completes, we can verify that Docker was successfully installed by running:
$ sudo docker version
At the time of writing this post, the current version was 20.10.7.
Note that docker must be run with sudo. For convenience, it’s possible to add the user account you’re using (pi) to the docker group to avoid having to use sudo all the time:
$ sudo usermod -aG docker pi
It’s also possible to run the hello-world container to make sure everything is okay:
$ sudo docker run hello-world
This should print out some information that everything’s properly running.
Next, I’m also going to install Docker Compose, as it will make it easier to get all containers up and running. On the Raspberry Pi, Docker Compose must be installed via Python 3’s pip package manager (pip3), which requires Python 3.x to be installed first:
$ sudo apt-get -y install libffi-dev libssl-dev python3-dev python3 python3-pip
$ sudo pip3 -v install docker-compose
Successful installation can be verified by running:
$ docker-compose -v
which will show the version number of the installed docker-compose script.
This completes the basic infrastructure setup. Before moving on, I’ll connect the CISS sensor to one of the Raspberry Pi’s USB ports and verify that it shows up in the /dev filesystem. It should show up as a new device file /dev/ttyACM0.
$ ls -l /dev/ttyACM0
crw-rw---- 1 root dialout 166, 0 Jul 9 07:17 /dev/ttyACM0
Note that accessing this device requires either root or membership in the dialout group. More on that later.
Note: Make sure that the Raspberry Pi is connected to a sufficiently powerful power adapter. A Raspberry Pi 4 with an additional device (CISS multi-sensor) connected via USB requires significant energy, which is more than standard USB-C ports can provide. If you experience sudden freezes, check the kernel log (
dmesg) forundervoltage detectedmessages.
macchina.io Remote Manager
I will use macchina.io Remote Manager to remotely access the Raspberry Pi (via SSH) and the applications it runs (macchina.io EDGE, Portainer, InfluxDB) once the device has been deployed to the final location (e.g., shop floor, etc.), where I no longer can directly access it in my local network. This requires setting up an account on our free Remote Manager server. After registering your new account and confirming your email address, sign in to the Remote Manager at reflector.my-devices.net and click the user icon or your email address on the top right.
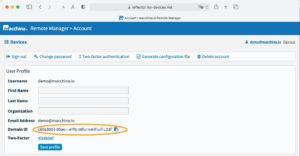
You will then see your Account page, and on it you will find your Domain ID. Copy that to the clipboard (by clicking the Copy button next to the ID) and save it in a text document. You will need it later on when setting up the macchina.io Remote Manager Gateway container.
Composing the Containers
Next I’m going to set up the containers. For that purpose, I’m going to use Docker Compose, and will write a docker-compose.yml file that specifies all the containers I want in my demo.
The following container images will be used:
- macchina/edge-ce: This is the GPL-licensed open source version of macchina.io EDGE, as available from GitHub.
- macchina/rmgateway: This is the macchina.io Remote Manager Gateway server, which will make SSH access and the various web interfaces of the applications available remotely via macchina.io Remote Manager.
- portainer/portainer-ce: Portainer provides a web-based user interface for Docker. We will only use Portainer to show that its web user interface can be accessed remotely via macchina.io Remote Manager. Of course, you can use Portainer to set up additional containers, as desired.
- influxdb:2.0: InfluxDB 2 provides a time-series database and includes a nice web-based user interface that, among other features, supports building dashboards.
The docker-compose.yml file for launching all of the above containers is nothing special. It sets up the four containers according to their respective documentation and also creates volumes where all data is persistently stored. It also exposes the ports for the various applications’ web servers. The docker-compose.yml file requires an environment file, which sets the domain ID to use for connecting to the macchina.io Remote Manager server. The GitHub repository also contains a .env file which defines the REMOTE_MANAGER_DOMAIN environment variable. This must be set to the Domain ID obtained earlier, when setting up the macchina.io Remote Manager account.
To set-up all the containers, clone the GitHub repository, edit the .env file and set REMOTE_MANAGER_DOMAIN, then run docker-compose:
$ git clone https://github.com/macchina-io/meta-macchina-edge-demo.git
$ cd meta-macchina-edge-demo
$ vi .env # change REMOTE_MANAGER_DOMAIN
$ sudo docker-compose up -d
To verify that all applications work, you can open the different web applications in your browser. The web applications run on the following numbers:
- macchina.io EDGE: 22080 (http://raspberrypi:22080)
- macchina.io Remote Manager Gateway: 8080 (http://raspberrypi:8080)
- Portainer: 9000 (http://raspberrypi:9000)
- InfluxDB: 8086 (http://raspberrypi:8086)
The default username for macchina.io EDGE is edgeadmin. The password is the same as the username. See the README for how to set a different password.
For logging in to macchina.io Remote Manager Gateway, you use the username and password from your macchina.io Remote Manager account created earlier.
When opening the Portainer web application for the first time, you will be asked to set a new username and password.
The default username for InfluxDB (as set in the docker-compose.yml) is macchina. The password can also be found in the docker-compose.yml file.
Setting Up Remote Access
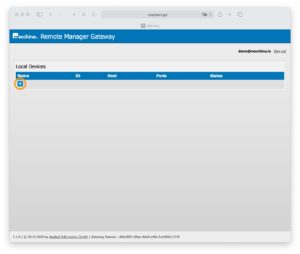
As the final step in this first part, I will set up remote access to all applications via macchina.io Remote Manager. To begin, go to the Remote Manager Gateway web application on port 8080. You will see a sign-in page, where you need to sign-in with your Remote Manager username and password, as you’ve set when registering for the account.
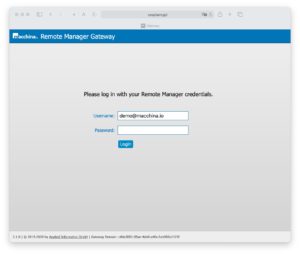
Enter your credentials and click the Login button.
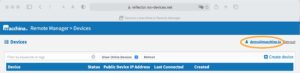
Next you will see an empty list of local devices. Click the plus (+) button to create the first device connection.
The first device connection will be for remote SSH access to the Raspberry Pi. Under Name, enter Raspberry Pi. ID and Domain can be left at the defaults. The ID has been randomly generated, and the Domain is the one specified in the Docker Compose environment file (REMOTE_MANAGER_DOMAIN). Then click Next to set up the IP address and SSH port.

Setting up the host IP address is a bit tricky, as there is no reliable way of determining the actual host IP address from within a Docker container on Linux. If the host has a fixed IP address, or a (local) domain name, we can use that. In my case, I will simply use raspberrypi as the host name, as my local router assigns that to the Raspberry Pi. Note that 127.0.0.1 (the default in the web user interface) will not work, as 127.0.0.1 is something different inside a container – it’s the container’s loopback address.
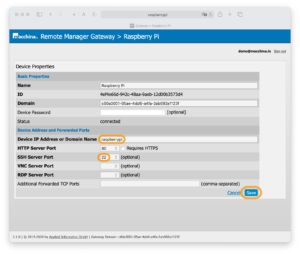
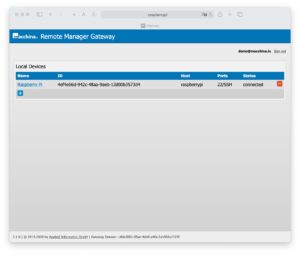
The SSH Server Port must be set to 22 (the default SSH port number in use) in order to enable remote access to SSH. The HTTP Server Port can be left as is, or set to empty – it will not be used. Clicking on Save brings you back to the Local Devices page, where you should now see the Raspberry Pi. After a few seconds, you should also see the Raspberry Pi in the Remote Manager Server web user interface, and should be able to connect to SSH via Remote Manager – more on that below.
Next we will create device connections for macchina.io EDGE, Portainer, InfluxDB and Remote Manager Gateway itself. Click the plus (+) button again to create another device connection. For Name, enter macchina.io EDGE, leave the rest at the defaults and click Next. Set Device IP Address or Domain Name to macchina-edge (the service name defined in docker-compose.yml, which Docker’s internal DNS server maps to the container’s IP address in the Docker network set up for the Docker Compose stack, so that other containers can use it) and HTTP Server Port to 22080 and click Save.
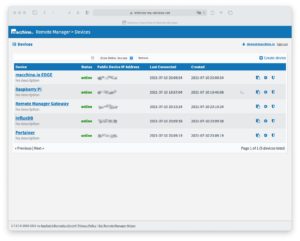
Repeat the above for Portainer (Device IP Address or Domain Name: portainer, HTTP Server Port: 9000), InfluxDB (influxdb, 8086) and finally Remote Manager Gateway (rmgateway, 8080). When done, the Local Devices list should like like this:
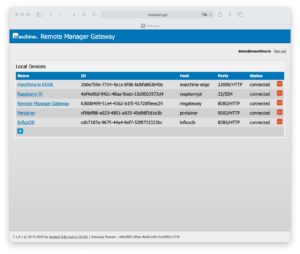
You should now also see all these devices in the macchina.io Remote Manager Server Devices list. Clicking on the device name will bring you to the web interface of the respective application.
For SSH remote access, you can either install the Remote Manager Helper application if you are using Windows, or use the WebTunnelSSH command-line tool from the Remote Manager SDK.
With Remote Manager Helper installed, you can click the Shell (>_) icon to launch the Windows SSH client (or PuTTY) via Remote Manager Helper for connecting to the Raspberry Pi. Alternatively, you can use WebTunnelSSH from the shell. Binary downloads for WebTunnelSSH for various platforms are available here. You can also build from source.
$ WebTunnelSSH -l pi https://4ef4e66d-942c-48aa-9aeb-12d00b3573d4.my-devices.net/
You will be asked for your macchina.io Remote Manager username and password, then, like with any ssh session, for the password for the pi user on the Raspberry Pi. Note that the Device ID in the URL passed to the WebTunnelSSH command (4ef4e66d-942c-48aa-9aeb-12d00b3573d4) is the one from creating the device connection in Remote Manager Gateway. You can get that URL by right-clicking the device name in the Remote Manager server device list and selecting Copy Link (or Copy Link Address).
To connect to the other web applications (macchina.io EDGE, InfluxDB, etc.), click on the respective name on the Remote Manager Server Devices page. A new tab will then open with the login page of the respective application.
This concludes the first part of this article. In the second part, I will first show how to write a script that reads sensor data from the CISS sensor and writes the data to InfluxDB, using the InfluxDB HTTP API. Then I’ll set up a simple dashboard to visualize the data with InfluxDB.
On to part 2.