Setting Up the macchina.io Remote Manager Server on AWS
macchina.io Remote Manager provides secure remote access to connected devices – for end users, service providers and support teams.
Setting up your own macchina.io Remote Manager server on Amazon AWS is now easier than ever. We now provide a pre-configured AMI (Amazon Machine Image) which has everything required to run the Remote Manager server preinstalled and configured on an Ubuntu 18.04 base system. This includes the MySQL server and the HAProxy frontend server.
Setting up a macchina.io Remote Manager Instance
To get started, first sign-in to your AWS Management Console, go to Compute/EC2 and click the Launch Instance button. Make sure your region is one of those where the Remote Manager AMI is available:
- eu-central-1
- us-east-1
- us-west-1
- ap-southeast-1
Click the Community AMIs item in the left sidebar. In the “Search for an AMI…” search box, enter macchina.io. You should see at least one result.

Look for an AMI named macchina.io Remote Manager (followed by a version number and timestamp) and click the Select button.
Next select an instance type. For small deployments (up to a few 100 connected devices and low number of simultaneous users), start with a general purpose t2.micro instance. For larger number of devices, scale up accordingly. A t2.medium instance should be able to handle a few 1000s of connected devices, a t2.xlarge instance 10000s. Generally, the number of CPU cores is more important than the amount of memory, especially if you expect larger numbers of simultaneous users.
Click Review and Launch to continue or configure instance details if required. In the final step (Step 7: Review Instance Launch), under Security Groups, click Edit security groups. Click Add Rule and add a rule for HTTPS.
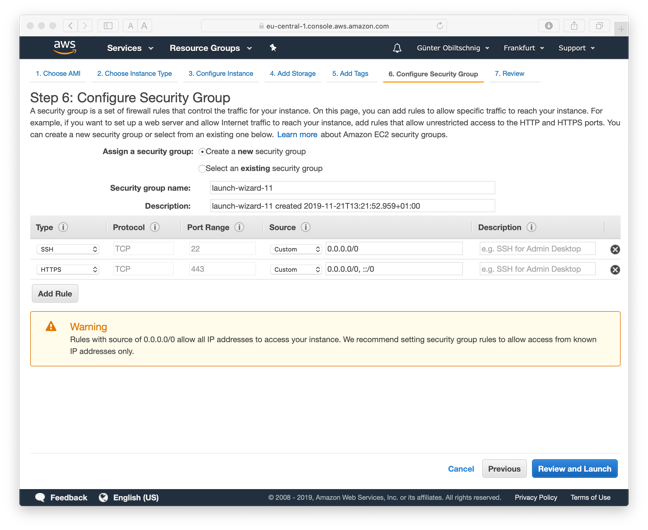
Make sure there is also a rule for SSH configured, which should be the default.
Click Review and Launch, then Launch and specify the SSH key pair to use for logging in to the new instance.
Configuring the macchina.io Remote Manager Server
After the instance has started, log-in to the instance with SSH, using the username ubuntu. In the home directory, you should see a file named passwords.txt containing the passwords for MySQL (root and reflector accounts) and Remote Manager (admin account). Note the password for the Remote Manager admin account.
ubuntu@ip-172-31-24-178:~$ cat passwords.txt
Remote Manager admin:     xxxxxxxx
MySQL Server   reflector: xxxxxxxxxxxx
MySQL Server   root:      xxxxxxxxxxxx
ubuntu@ip-172-31-24-178:~$
As a first step, we recommend changing the password of the Remote Manager admin account. To do so, start the OSP Shell and enter the passwd command to change the password:
ubuntu@ip-172-31-24-178:~$ ospsh
Username: admin
Password:

OSP Command Shell Service ready.
Copyright (c) 2009-2019, Applied Informatics Software Engineering GmbH.
Enter "h" or "help" for a list of commands.

osp> passwd
New Password:
Retype New Password:
osp> quit
ubuntu@ip-172-31-24-178:~$
Wildcard DNS
The next step is to set up a wildcard DNS entry for your new Remote Manager server and install a proper wildcard certificate.
In order for the Remote Manager Server to be fully functional, a wildcard domain name record for the Remote Manager Server must be set up on your preferred domain name service provider (e.g., Amazon Route 53 or Dyn). A wildcard domain name makes sure that all host names within a given domain will be mapped to the same address. A wildcard domain name record looks like an ordinary record. However, the leftmost part of the domain name is an asterisk. For example, the wildcard domain name record:
*.my-devices.net A 23.253.201.137
will map all domain names ending in .my-devices.net, such as www.my-devices.net, reflector.my-devices.net or 33a9c5a3-81d8-4d3a-8068-1c910b3c61f6.my-devices.net to host 23.253.201.137, which runs the Remote Manager Server.
TLS Wildcard Certificate
Similar to a wildcard domain name, a wildcard SSL/TLS certificate will be required for secure (TLS) access to the server and connected devices. A normal SSL/TLS certificate is only valid for a fixed limited number of domain names (e.g., www.my-devices.net, reflector.my-devices.net). A wildcard certificate may contain a wildcard domain name (*.my-devices.net) which makes it valid for all domain names matching its wildcard domain name. Wildcard certificates can be purchased from most certificate providers, and can also be obtained for free from Let’s Encrypt.
The wildcard certificate, along with the private key in the same file, both in PEM format, must be copied to /etc/haproxy/reflector.pem. Since the file contains the private key, the access permissions should be set so that only the haproxy user can read the file.
After changing the certificate, restart HAProxy with:
$ sudo service haproxy restart
The domain name of your server must be specified in the Remote Manager server main configuration file, which is located at /home/reflector/etc/reflector.properties. Open it in a text editor with:
$ sudo vi /home/reflector/etc/reflector.properties
or:
$ sudo nano /home/reflector/etc/reflector.properties
(depending on your editor preferences) and change the reflector.domain property to match your domain. Specify the fixed part of your wildcard domain. If you do not specify the correct domain name, or if the DNS record has not been properly set up, you won’t be able to log into the Remote Manager Server using the web user interface.
License File
In order to connect more than five devices to the server, a license file for the Remote Manager server is required. If you have purchased a macchina.io Remote Manager subscription, you should have received a license file named reflector.license. You can also contact us to request a limited license for evaluation purposes. Copy the license file to the /home/reflector/etc directory.
After changing the reflector.domain setting and installing the license file, restart the Remote Manager server with:
$ sudo service reflector restart
Congratulations, your new macchina.io Remote Manager server is now ready for connecting the first device. You should also be able to sign-in to the web interface of your server via HTTPS.
For more information regarding configuring and customizing the server, please ask us for the macchina.io Remote Manager manual.